Story
of my Naked Fixie
Part Diary,
Part Technical Manual, Part Tips & Tricks
After finding, restoring, and converting my old high school bike, I didn't want to leave it in the garage at work; I was afraid it would get dented, chipped, or worst of all - stolen. A little too much sentimental value for me to risk. Besides, I wanted to get a real beater ride, so I can give it a funky paint job and create an art bike.
So one day I found an ad for a Specialized Sirrus of the same vintage on craigslist for $80. I knew the seller didn't know anything about bikes, because he thought it was a Sirrus-brand bicycle. At first I thought it would be good to have around for spare parts, so on February 22, 2007, I drove to San Jose to check out the bike. At first sight, the bike looked pretty rough. It had been sitting on an apartment balcony for a couple years, so the tires were flat, the chain was rusted, and there was a heavy layer of oxidization on all of the aluminum parts. To make it worse, the frame was a 52cm and I usually ride a 54cm, but the bike was straight, so I offered the guy $60 and he accepted. I figured the cranks would be worth at least $40 anyway...
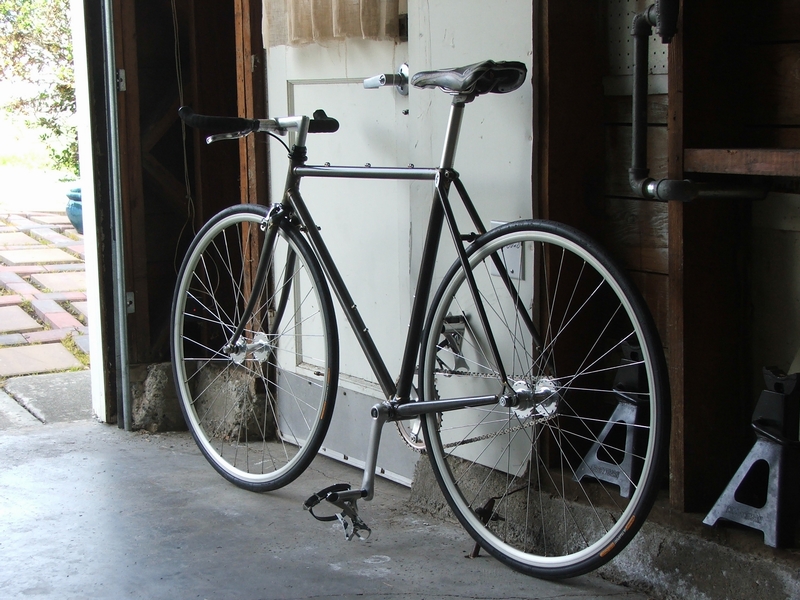
So the first thing I do, what I love to do most, is strip everything off! Since I had already recently converted a nearly identical Sirrus to a fixie, I had all the right tools, knew what I was doing, and was flying through the work. Within a few hours, I had photographed the bike and had dismantled everything. Besides having the headset and fork crown pressed out at my LBC, I was able to do everything else myself.
Now that I had a bare frame, I figured that I would remove the orignal paint, so I can develop some cool art bike paint scheme. So with an old can of Jasco Speedomatic Paint Remover that I had, I got to work on the frame and fork. It was strange, some areas of paint would bubble up within ten minutes and the paint could be easily wiped away to bare metal. Other areas, it seemed like the paint stripper had virtually no effect on the paint. On those areas, I used a plastic scraper to try and help scrape off more paint - with very limited success. At one point, I figured that I could use an old brass brush that I had in the garage; since brass was softer than steel, I figured the frame would not be damaged. This worked better, but it still tooks many applications of paint stripper and lots of muscle to get all of the paint off - not to mention the nasty fumes and the stinging burn when an occasional splat of paint stripper would land on my face. After two days of hard labor and making a mess of the garage, I had the frame and fork stripped to my satisfaction.
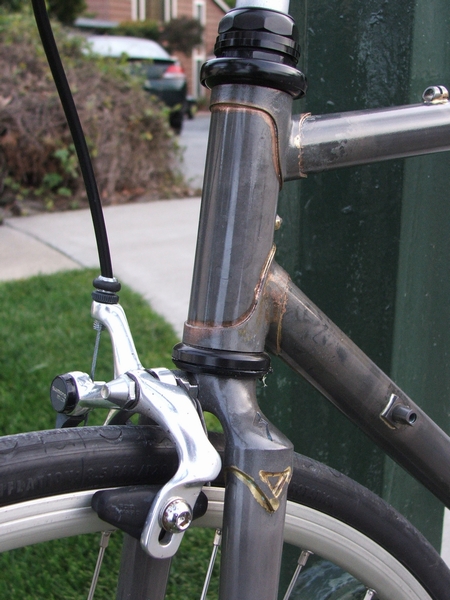
Looking at the naked frame and fork, I saw that everything was in pristine condition - no scratches, dents, or rust anywhere. The dark steel tubes were striking and the brass brazed lugs created a subtle bit of visual interest, while revealing the actual construction of the bike (pic). I realized that the bare frame and fork was already a thing of beauty. So at that point, I decided that instead of painting the frame, that I would simply put a thin layer of clearcoat to prevent any future rusting. Prior to spraying, I wiped the frame and fork down with Jasco Metal Etch, to remove any oil or film on the metail, to ensure a durable finish. I then used my air-compressor to blow everything nice and dry.
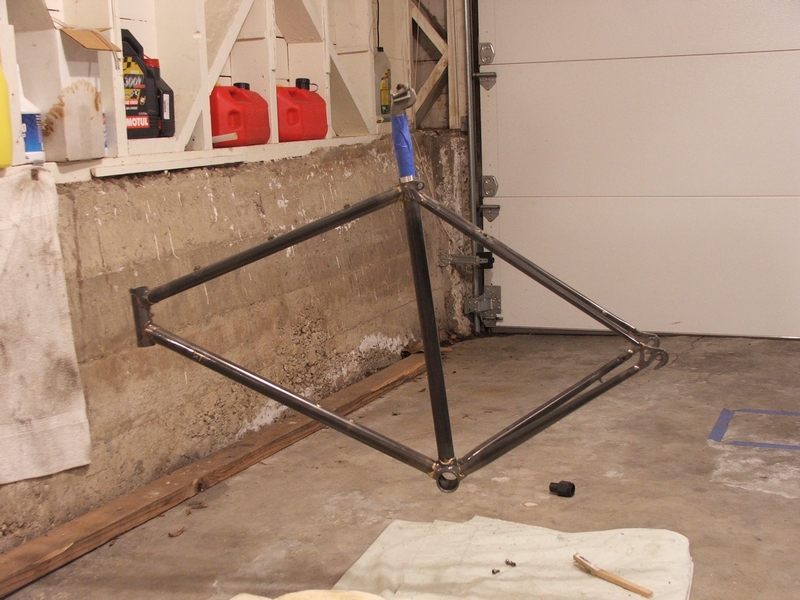
So a new problem - how do I paint the entire frame in my garage without some kind of special stand to support the bike? I thought about this for a while and then figured it out. I would simply insert an old seatpost into the frame and use thin wire to tie the top of the seatpost to the crossbar of my garage door (pic). So I taped up the seatpost, so I doesn't get blasted with clearcoat. I also had an old bottom bracket, which I lightly screwed on, to protect the threads (this was a trick I remembered from the Richard Sachs website). So with the frame hanging in mid-air, with an old bedsheet underneath, and my wife's Audi a couple feet away - I shook the rattle-can vigorously and start spraying! I worked quickly all the way around and then grabbed the seatpost so I could spray the underside of the bike. Within a couple minutes, everything was clearcoated and looked pretty good - no suicidal moths decided to become a permanent part of my bike. After hanging in the garage overnight, the frame was dry enough to touch in the morning. This meant that after a few more days for the clearcoat to fully harden, I could start building the bike up.
6/30/2007 - I sold the bike to a young lady in San Francisco.
The following is the summary of the components, using as much of the original parts as possible:
Frame: 1988 Specialized
Sirrus, 52cm. Double butted Cro-moly with 126mm spacing. Paint stripped and
clearcoated. Serial Number: GF711239-C680A.
Fork: 1988 Specialized Sirrus 1" threaded. Cro-moly with 100mm spacing.
Paint stripped and clearcoated.
Front Wheel: Bianchi Pista. Cartridge bearings with 9.5mm x 137mm solid
axle for 100mm spacing. I found this pair on craigslist
and talked down the seller for $120 for the pair, with cog and lockring. I've
heard that these wheelsets are pretty low quality, but they haven't let me down
yet and they look very classy in chrome and silver.
Rear Wheel: Bianchi Pista. Cartridge bearings with 10mm x 157mm solid
axle for 120mm spacing. At first, I thought I had a major dilemma on my hands.
After adding a 3mm aluminum hub spacer on each side, it was now 126mm, matching
my frame dropouts. However, there was not enough axle length for the axle nuts
to fully thread, especially since the nuts have a built in washer, which makes
the entire thing very thick. At first I thought I would simply buy a longer
axle and be done with. After hammering out the cartridge bearings, I realized
that the axle is not a standard threaded rod, but a specific flanged and tapered
axle design for the 120mm hub. I thought I would have to sell the wheels. Then
it occured to me, I could just screw the axle nuts on backwards, with the built-in
washers facing outside. If forces you to use a box wrench to tighten the nuts
and it looks a little odd, but the nut was fully threaded and safe! Eventually
I bought a couple 10mm x 1mm nuts at my local AutoZone and just used a washer
for a better bearing surface. From freakout to contemplating buying new wheels
and finally reaching a $2 solution. The chainline is approximately 45mm from
centerline of bike.
Cranks: Shimano 105, 170mm. Not 165mm, which would be ideal - but I already
have them and I haven't scraped a pedal mid-turn yet! The cranks were heavily
oxidized, but just a scouring pad and Simple Green left the cranks looking pretty
decent.
Chainring: Shimano Biopace
42t. I decided to keep the original chainring, since I already had it and that
Sheldon Brown uses it on his fixies, so I thought I would at least try it. Just
make sure when you adjust the chain tension, that your rotate the cranks so
they are horizontal - that is when the oval chainrings provide the most tension.
Adjust is so there is just a tiny bit of play when the cranks are horizontal,
so when the cranks are vertical, there is a good amount of slack, but nothing
that would make the chain fall off. Pretty goofy stuff huh?
Cog:
Rockwerks 18t 3/32". I took off the 16t cog which came with the Pista wheelset,
needed taller gearing for my hilly neighborhood.
Bottom Bracket: Specialized 113mm spindle, standard 1.370"l x 24TPI
English thread - disassembled, cleaned, greased, adjusted, and ready to go.
If you get an old bike, always repack all of the bearings, you'll be surprised
how rough and dry everything can be - and that old nasty grease smell... I knew
from my first conversion that the 113mm spindle actually aligns pretty good
with a standard rear track hub - all I need was a set of short stack bolts and
put the chainring on the outside face of the crank spider. The chainline alignment
is probably off by a couple millimeters, but its close enough for me. I'll worry
about the chainline next time I plan on riding a century on a fixie.
Headset: The original headset was very rusty, so I had a cheap new one
pressed in.
Chain: SRAM PC-1
Nickel 1/8" single-speed. The original chain was rusted out, so I bought
a new one. The SRAM was only $15 and is really nice, with flat side plates,
instead of the bent places for a shifting drivetrain. I'm using a 3/32"
chainring and cog, so there is a little bit of lateral play, but overall its
worked fine. Since the Sirrus has horizontal dropouts with nearly an inch of
adjustability, that's a really good thing, but with my gearing, one less link
was too short and one added link would create way too much slack. So this is
where the half link
works beautifully - stuck on the link and now the axle is right in the middle
of the dropouts, with plenty of room for fine tuning.
Stem: SR forged aluminum
Handlebar: Aluminum. Flipped and chopped with black cork wrap.
Brake: Shimano 105 with silver Tektro RX
2.0 in-line/cyclocross levers. Cleaned offthe brake and lubricated all the
pivot points. The Tekro levers use the same type of brake cable with the round
end, so I even used the original cable, but greased it and used new cable housing.
Since the left lever was already on my red Sirrus, I just used the right lever
and flipped it upside down.
Pedal: Shimano 105 with original cage and straps. Sometimes I use a set
of Wellgo platform pedals with MKS chrome toeclips. The toeclips don't hold
your feet in nearly as good as straps, but the easy entry/exit is good when
you're stopping and going a lot while wearing regular shoes.
Seatpost: Strong aluminum,
27.0mm diameter.
Saddle:
Bontrager Race Lite mountain bike saddle with titanium rails, handmade by Selle
San Marco for Bontrager. This old saddle was orignally on my Dean Jester, but
has been sitting around for a couple of years. The black saddle with silver
stitching matches the colors of the bike wonderfully.
|
Ratio |
18 |
|
42 |
4.6 |
![]()